Colt McAnlis · May 27, 2016 · 5 min read

When it comes to image data on the internet, JPG has been a large standard for some time now. However in 2013, Google(and a set of other open source contributors) were able to create a new image codec algorithm, named WebP, which aimed to compress images smaller than JPG while keeping the same image quality.
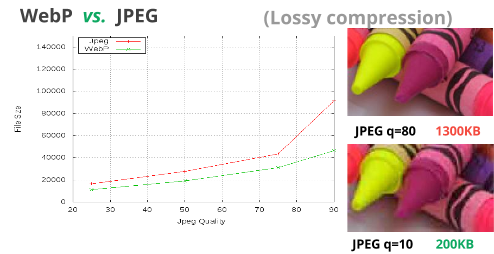
How good is it? I’ve seen WebP’s savings in the 24%-35%, depending on the size & complexity of the image; which is pretty impressive, considering how much JPG is already getting out of the file.
For me, the file saving itself is worthy of swapping all my app’s JPGs to WebP. When you add in the fact that WebP is supported in the majority of web browsers, and natively on Android, I’d call it a “Slam Dunk” for most applications.(but that’s my personal opinion);
To understand why WebP gets those savings over JPG, we have to take a look at how the codec itself works.
Where does WebP Come from?
The WebP Image file format originates from the VP8 video codec(you may better know it as WebM). One of the strong features of that the VP8 codec is the ability to do intra-frame compression, or rather, each frame of the video is compressed, and then differences between subsequent frames are compressed.
This is where WebP comes from: It’s a single compressed frame of a WebM file.
Or, more accurately, the core of WebP comes from WebM. Since it’s release in 2011, there’s been a lot of changes & updates specifically to the WebP file format that have stayed unique to it as a file type. Namely things like Alpha, Lossless mode, and in some oddly ironic twist, animation support.
Yup, you read that right: WebP is an images format… derived from a video format… which supports animation.(Check out the GIF version, vs the WebM version, vs the WebP version of a dancing banana)

But we’re going to ignore all that extra fancy stuff for now, and just focus on understanding how the lossy mode of the format works.
Lossy mode
The lossy version of WebP encoding is built to compete with JPG for a still image format. And as such, you’ll notice a number of striking similarities in the formats.
MacroBlocking
The first stage of the encoder is to split the image into “macro blocks”. Typical macro block consists of one 16 * 16 block of luma pixels, and two 8*8 block of chroma pixels. This stage is very similar to the JPEG of converting color space, downsampling the chroma channels, and subdividing the image.

Prediction
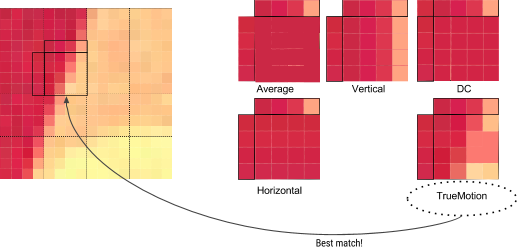
Each 4*4 sub block of a macroblock then has a prediction model(aka filtering) applied to it. Filtering is very popular for PNG, which does the same thing per scan-line, however WebP applies filtering using a block method. This is done by defining two sets of pixels around a block: the row above it, A, and the column to the left of it, L.

Using A and L, the encoder will fill in a test block of 4*4 pixels, and determine which one produces values closest to the original block. The different ways these blocks can be filled are called “Predictors”:
Horiz prediction - Each column of the block with a copy of the previous column
Vertical Prediction - fills each row of the block with a copy of a previous row
DC Prediction - fills block with a single value using the average of the pixels in the row above A and the column to the left of L
True Motion prediction - a super advanced mode I’m not getting into right now.
It’s worth nothing, btw 4*4 luma has 6 additional modes, but you get the picture at this point;)
JPGity it
The final stages of WebP encoding look very similar to our old friend JPG
A DCT filter is applied to the residual values for a block
The DCT basis matrix is then quantized
The quantized matrix is then re-ordered, and sent to a statistical compressor.
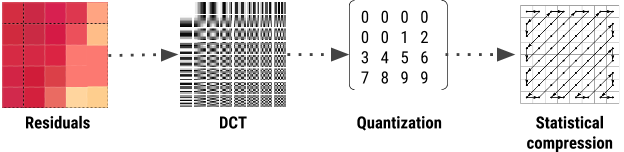
The two main differences being that:
1) The input to the DCY stage isn’t the raw block data itself, but rather the output of the prediction phase
2) The statistical compressor used for WebP is an Arithmetic Compressor, which is similar to the Huffman encoder that JPG uses.
The result
The end result is that WebP feels like kinda like an advanced mode of JPG. The prediction phase seems to be the biggest win to reduce unique color coefficients further so that the rest of the pipeline can compress the image data more efficiently. You can check out the case study of WebP vs JPG yourself, or trust that a lot of smart people who care about accuracy and graphs, made sure that the image below was a true representation of things.
In conclusion
The addition of a predictor mode to the JPG process allows WebP to take data compression to a place that JPG simply can’t go, which is why it’s easy to see how WebP can get wins over it’s JPG based cousin.
As mentioned, there’s a separate lossless webP mode, but that’s a topic for another post.