Colt McAnlis · Apr 14, 2016 · 9 min read

One of the benefits of my role here at Google is that I get to troll through a lot of Android applications, and look for common places where people might be able to improve their performance.
Lately, I’ve been noticing the growth of a frightening trend: Bloated PNG files.
As I talked about last time, PNG is a pretty awesome, flexible image file format. It’s got great quality control, and supports transparency. As such, it’s become the go-to for transparency-seeking developers for a few decades now.
The problem is that it’s pretty easy to make bloated PNG files; heck, just adding two pixels to the width of your image could double its size. So, it’s easy to assume that most of the PNGs out there just haven’t been given the love & care they deserve.
So, now that I’ve trolled through about 100 APKs, I’ve decided to pass along my top suggestions on reducing PNG file size. These suggestions are based on things I’ve seen in real apps that real humans are using. YMMV if your app is only used by robots, or small squirrels.
You should be using an optimizer tool
Once you understand the PNG file format, it becomes clear that there’s some obvious areas of improvement that could result in smaller file sizes:
- Removing unneeded chunks
- Reducing unique colors
- Optimizing line-by-line filter choice
- Optimizing DEFLATE compression
And this isn’t new information. PNG optimazation has been a common problem for a long time; 20 years ago, Ken Silverman wrote one of the first popular PNG optimizers, PNGOUT.(Which became the backbone of the famous Duke Nukem 3D engine.) Since then, there’s been a lot of new PNG optimizers that have hit the scene; A quick google search will bring up a plethora of options for you to choose from:
PNGQuant, ImageMagick, PNGGauntlet, PNGOut, PNGCrush, OptiPNG, CryoPNG, PNG Compressor, Yahoo Smush.it, PNGOptimizer, PunyPNG, TinyPNG, PNGWolf, Advpng, DeflOpt, Defluff, Huffmix, TruePNG, PNGngs9, Median Cut Posterizer, scriptpng, pngslim, zopfliPNG
The trick here, is that in the full spectrum of things a tool could do, each one of these tools does a subset of it; So there’s no “best tool” for the job, so make sure you’re spending the time to evaluate which one works best for you, and then adopt the hell out of it.
FWIW, A personal favorite of mine on that list has to be zopfliPNG. It reduces PNG file size by providing a more efficient, and powerful deflate stage in the compressor, allowing it to find better matches in your data. It can decreate the PNG file-size by 5%, without impacting image quality in any form… sure it’s significantly slower, but it’s impressive that improvements can still be made to the old-school DEFLATE codec.
The gist here, is that if you’ve got a lot of data coming through your application, you should have a PNG optimization tool in your upload/distribute pipeline, if only to keep the crazy at bay.
Reducing Colors
Now, if the above tools just aren’t working for you, or you’d like to adopt a more manual approach to improving some of your assets before it gets tossed to one of the above tools, then it’s worth taking matters into your own hands.
Even though there’s a lot of things you could manually do, I suggest that you should only focus on reduing the number of unique colors in your image and then let a tool take it the rest of the way.
The reason for your focus here, is that reducing unique colors directly influences the compression potential at every other stage of the pipeline; and tools can do the rest.
See, the filtering stage of the PNG compression step is powered by how variant adjacent pixel colors are to each other. As such reducing the number of unique colors in the will reduce variation in adjacent pixels, decreasing the dynamic range of values that are spit out from filtering.
As a result, the DEFLATE stage will find more duplicate values, and be able to compress better.
It’s worth nothing though, that reducing the number of unique colors, we’re effectively applying a lossy encoding stage to our images. THIS is why you should handle this process manually. Tools have a difficult time understanding human perceptual quality, and in some cases, small errors to a tool can look like huge errors to a human eye. But, if done the right way, it shouldn’t be noticeable to the user, and can save a huge amount of space.
PSA: Choose the right pixel format
This shold go without saying.. But I’ve seen example in a few APKs that prove otherwise:
You should make sure to use the right pixel format for your PNG file.
For example, if you don’t have alpha in the image, then using the RGBA 32bpp option is a waste of an entire 1/4 of your image; instead, use the 24bpp true color format(or jsut use JPG). Likewise, if your image just contains grayscale data, you should only be storing it as 8bpp.
Basically, make sure you’re not unintentionally bloating your PNG file by using the wrong type of pixel format.
Indexed images, FTW!
Moving on, color reduction should always start with taking a stab at trying to optimize your colors so that it could be defined using the INDEXED format. INDEXED color mode, basically choose the best 256 colors to use, and replaces all your pixels with an index into that color palette. The result, is a reduction from 16 million colors(24bpp) to 256, which is a significant saving.
Here’s an example image, and it’s indexed variant:

The example Google Doodle above was exported in Photoshop’s “save for web” feature, and the image format was set to PNG8, which created this color palette for the image:
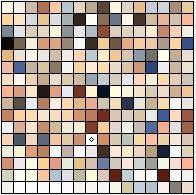
Basically, by moving to indexed images, you’ve replaced the unique color at each pixel, with a pointer into the palette instead. The result is moving from a 32bit per pixel to 8 bits per pixel, which is a nice first-step file size reduction.
This mode creates further savings when you consider how the filtering and deflate stages are applied:
- The number of unique pixels has been reduced, meaning that there’s a higher probability adjacent colors will point to the same color.
- Since the number of similar adjacent colors increases, the filtering stage will produce more duplicate values, such that the LZ77 phase of DEFLATE can compress it better.
If you can represent your image as a paletted images, then you’ve gone a great way to significantly improving the file size, so it’s worth investigating if the majority of your images can be converted over.
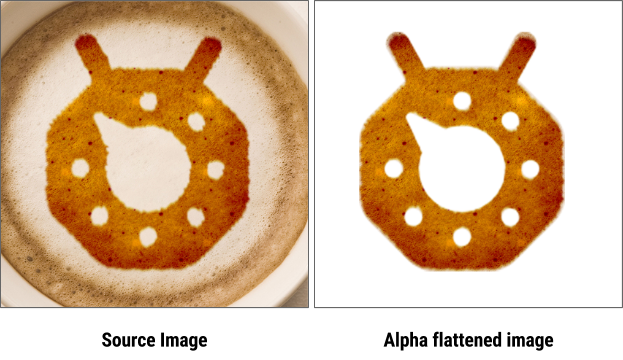
Optimizing fully transparent pixels
One of the nice features of INDEXED mode, is that you can denote specific colors in your palette to act as “transparent”. When the PNG file is decoded into RGBA in main memory, transparent pixels will be set accordingly. What’s interesting here is that this transparency mode is entirely binary; a given pixel is either visible, or not.
This type of “punch through” transparency is pretty dfficient in terms of compression; Normally, it’s used for large areas of the background that are transparent, and as such, there’s lots of self-similar pixels that the PNG Compressor can take advantage of.
But it’s only available in indexed mode. There are situations where you want to use the same “punch through” transparency, but need to use full RGB mode as well.
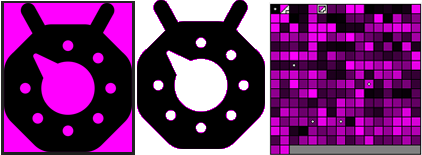
In these cases, it’s easy to make the mistake of not properly masking out your invisible pixels. Consider the example below; both images support transparency & Truecolor, but one of them is significantly smaller.
The reason for this size difference becomes apparent, when you disable the alpha channel:
Even though the Alpha channel will only allow some portion of the image to be rendered, there’s a FULL SET of pixel data in the RGB layer, meaning that the filtering & DEFLATE stages will still have to go through and compress all that data.
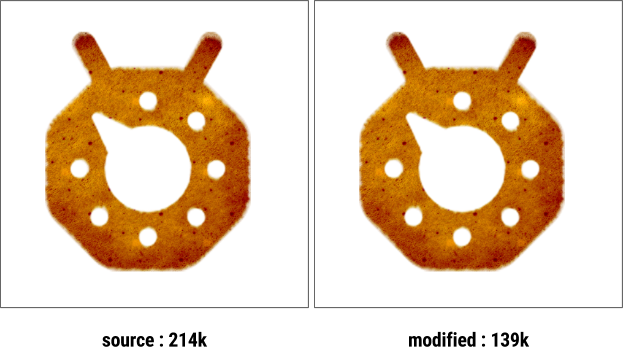
Instead, if you know those pixels won’t be seen, make sure they are homogeneous. When we will the non-visible pixels with a singler value; So we’ve flattened the parts of the image that won’t be seen.
The result is that more of each row is a single color, and thus the interpolation predictor, and Deflate stages will produce better compression. Basically, this is a fun little hack to let you get punch-through transparency, in true-color mode, with a smaller file-size footprint.
Lossy Pre-process
The indexed mode in PNG is fantastic, but sadly, not every image will be able to be accurately represented with only 256 colors. Some might need 257,310,512 colors, or 912 colors to look correct. Sadly, since Indexed mode only supports 256 colors, these images have to default all the way to 24bpp, even though only a subset of colors are actually needed.
Thankfully though, you can get pretty close to index savings by reducing colors manually.
The process of creating an indexed image, may be better descripted as vector quantization. It’s sort of a rounding process for multidimensional numbers. More directly, all the colors in your image get grouped based upon their similarity. For a given group, all colors in that group are replaced by a single “center point” value, which minimizes error for colors in that cell.(or, “site” if you’re using the Voronoi terminology)
The image below shows this process for a 2D set of values.
The result of applying VQ to an image has the effect of reducing the number of unique colors, replacing it with a single color thats “pretty colose” in visual quality.
It also has the ability to allow you to define the “maximum” number of unique colors in your image.
For example, the image below shows the 24-bit-per-pixel version of a parrot head, vs a version that only allowed 16 total unique colors to be used.
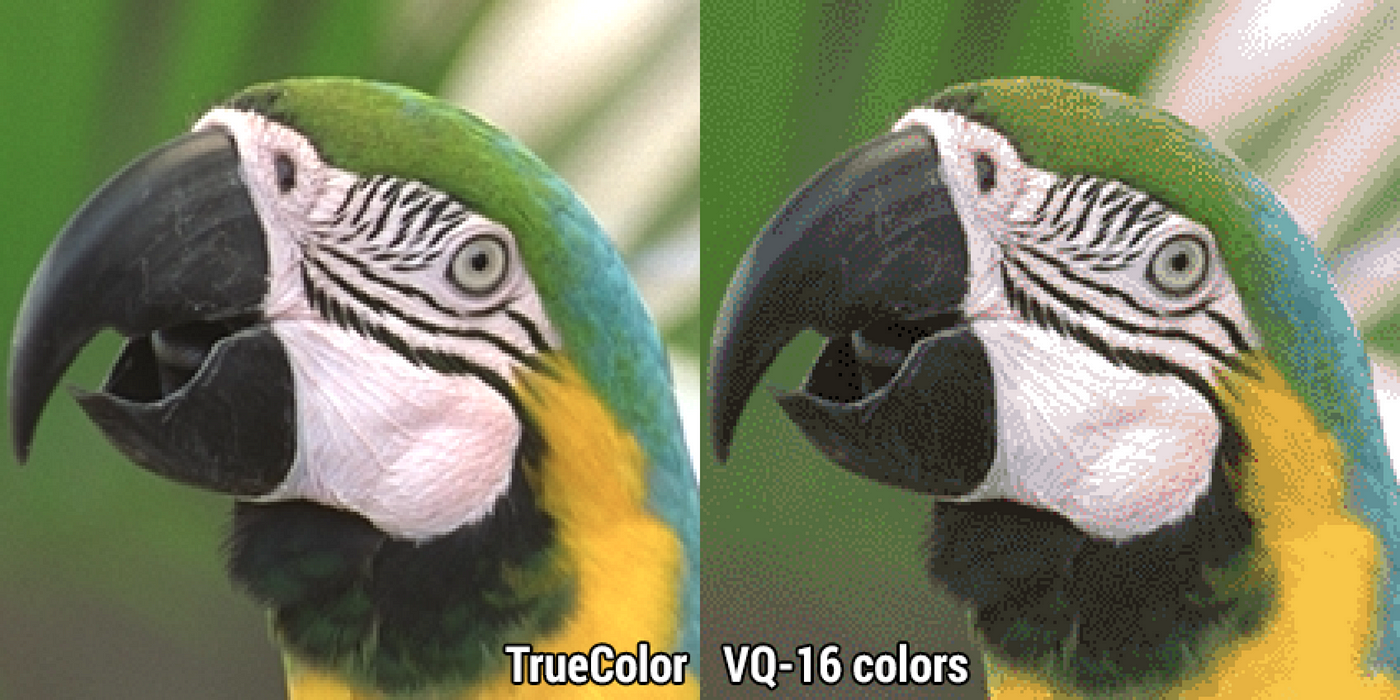
Immediately, you can see that there’s a loss of quality; most of the gradient colors have been replaced, giving the “banding” effect to the visual quality; obviously this image needs more than the 16 unique colors we gave it.
Setting up a VQ step in your pipeline can help you get a better sense of the true number of unique colors that your image uses, and can help you reduce them significantly. Sadly though, I don’t know of any image optimization tool out there that allows you to specify these values manually, other than pngquant. So, unless you’re using that tool, you might have to create your own VQ code to do this.
It’s all about collaboration
The truth is, you should be using a tool to help you reduce the size of PNGs to as small as possible; The authors of these tools have spent a lot of time working on the issues, and it’s much faster for you to leverage their work. Thar being said, there’s still a lot of work that can be done by your artists(and yourself) to an image before sending it off to the extra programs to do their magic.
So, go out there and make some smaller PNGs!